Introduction
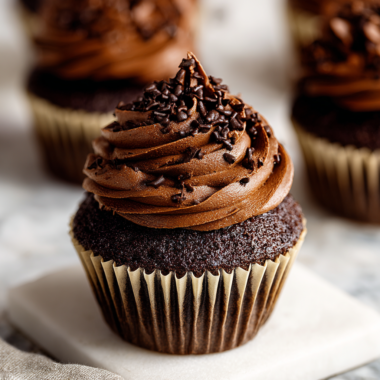
Oreo cupcakes bring together two beloved treats—the classic Oreo cookie and the ever-popular cupcake. These delightful confections perfectly balance chocolate and cream, making them an ideal dessert for any occasion, from birthday celebrations to casual get-togethers. Whether you're an experienced baker or a novice looking to impress, these cupcakes are not only fun to make but also irresistible to eat.
The charm of Oreo cupcakes lies in their versatility. You can customize them with various toppings or fillings, but the fundamental recipe never disappoints. Imagine biting into a soft, moist chocolate cupcake filled with rich cream and topped with a layer of Oreo crumbs. These cupcakes not only taste fantastic but also provide a visual feast, making them a hit at parties or family gatherings.
Ingredients
- 1 ½ cups all-purpose flour
This provides the structure for the cupcakes, giving them a light and fluffy texture. The right amount of flour is crucial for achieving the perfect crumb. - 1 cup sugar
Sugar sweetens the batter, contributing to the overall flavor. It also helps retain moisture, ensuring the cupcakes stay tender. - ½ cup unsweetened cocoa powder
Cocoa powder brings the rich chocolate flavor that pairs beautifully with the Oreo cookies. It contributes depth and a hint of bitterness, balancing the sweetness. - 1 teaspoon baking soda
Baking soda is a leavening agent that helps the cupcakes rise. It reacts with the acids in the batter, creating carbon dioxide bubbles that make the cupcakes light and airy. - ½ teaspoon salt
Salt enhances the flavors in the cupcakes, providing a contrast that makes the sweetness more pronounced. It also balances the rich cocoa flavor. - 1 large egg
Eggs provide moisture and act as a binding agent in the batter. They help hold all the ingredients together while also contributing to the structure. - ½ cup vegetable oil
Oil keeps the cupcakes moist and adds richness. Vegetable oil creates a tender texture, making the cupcakes enjoyable to eat. - 1 cup buttermilk
Buttermilk adds a slight tang and helps create a soft, tender crumb. It also reacts with baking soda, enhancing the rise of the cupcakes. - 2 teaspoons vanilla extract
Vanilla extract adds a warm, inviting flavor that complements the chocolate. It enhances the overall aroma and taste of the cupcakes. - 10 Oreo cookies, chopped
Chopped Oreos not only provide bits of cookie within the cupcake but also add their signature cream filling, enhancing the overall flavor. - 1 cup heavy cream
Heavy cream is essential for making a rich frosting. It whips well and provides a luxurious texture that pairs beautifully with the cupcakes. - 1 cup powdered sugar
Powdered sugar sweetens the frosting while giving it a smooth texture. It dissolves easily, creating a creamy consistency that's perfect for spreading. - 5 Oreo cookies, crushed for topping
Crushed Oreos provide a delightful crunch and an extra burst of flavor on top of the frosting. They make the cupcakes visually appealing and add to the Oreo experience.
Directions & Preparation
Step 1: Preheat your oven to 350°F (175°C) and line a muffin tin with cupcake liners.
Preheating the oven ensures that the cupcakes bake evenly. Using cupcake liners not only makes for easy removal but also adds an attractive touch. Make sure the liners are set properly in the tin to maintain their shape while baking.
Step 2: In a large bowl, whisk together the all-purpose flour, sugar, cocoa powder, baking soda, and salt.
Combining the dry ingredients first helps ensure that the cocoa powder and baking soda are evenly distributed. This step is important for consistent flavor and texture in the final cupcakes. Use a whisk to break up any clumps in the cocoa powder.
Step 3: In another bowl, mix the egg, vegetable oil, buttermilk, and vanilla extract until well combined.
Whisking the wet ingredients separately helps incorporate air, contributing to a lighter batter. The oil and buttermilk will also mix more thoroughly when combined this way, ensuring a moist cupcake.
Step 4: Gradually add the wet ingredients to the dry ingredients, stirring until just combined.
It’s crucial not to over-mix at this stage. Over-mixing can lead to dense cupcakes rather than light and fluffy ones. Stir gently, just until you no longer see streaks of flour.
Step 5: Fold in the chopped Oreo cookies gently into the batter.
Incorporating the Oreos last allows you to keep their texture intact, adding delightful bits of cookie in every bite. This step enhances the Oreo flavor throughout the cupcakes.
Step 6: Divide the batter evenly among the prepared cupcake liners, filling each about two-thirds full.
Filling the liners two-thirds full allows the cupcakes to rise without overflowing. This ensures they have enough space to expand while baking and maintain an appealing dome shape.
Step 7: Bake in the preheated oven for 18-20 minutes, or until a toothpick inserted into the center comes out clean.
Baking times can vary based on your oven, so it’s important to keep an eye on the cupcakes. Testing with a toothpick helps you gauge doneness; if it comes out clean or with few moist crumbs, they’re ready to come out.
Step 8: Remove from the oven and let them cool in the pan for about 5 minutes before transferring them to a wire rack.
Cooling the cupcakes in the pan allows them to firm up slightly, reducing the risk of breaking when you transfer them. Once they’re set, moving them to a wire rack ensures even cooling and prevents sogginess.
Step 9: While the cupcakes cool, prepare the frosting by whipping the heavy cream until soft peaks form, then gradually add the powdered sugar until combined.
Whipping the cream to soft peaks ensures a light and airy frosting. Gradually adding powdered sugar helps avoid clumping, creating a smooth and creamy texture ideal for spreading or piping.
Step 10: Frost the cooled cupcakes with the whipped cream and top with crushed Oreos.
Generously frosting the cool cupcakes allows the flavors to meld beautifully. The crushed Oreos on top provide a visually appealing finish and an enjoyable crunch, enhancing every bite.

The Chocolate Delight Factor
Chocolate is the star of these Oreo cupcakes, and its richness plays a pivotal role in creating a memorable dessert. The unsweetened cocoa powder not only elevates the chocolate flavor but also pairs effortlessly with the sweetness of the cream and cookies. Opting for high-quality cocoa can enhance the depth of flavor, making each cupcake an indulgent experience. The interplay of the chocolate cake with the Oreo filling creates a perfect balance, ensuring that no bite is ever too sweet.
Creative Variations to Explore
While the classic Oreo flavor is beloved, there are numerous ways to put your unique spin on these cupcakes. Consider swapping out the standard Oreo cookies for seasonal flavors like pumpkin spice or peppermint for festive occasions. You could also infuse the batter with espresso or add layers of chocolate ganache for an extra indulgent touch. Don’t hesitate to experiment; these cupcakes are a canvas for your baking creativity, allowing for endless customizations to suit your taste preferences.
Oreo Cupcake Decorating Ideas
Presentation can greatly enhance the appeal of your Oreo cupcakes. Beyond standard frosting, consider using a piping bag to create fun swirls, or top each cupcake with mini Oreos for an eye-catching effect. Chocolate drizzles or a dusting of cocoa powder can add flair as well. Adding decorative cupcake toppers or themed designs can turn your creation into an attention-grabbing centerpiece for parties, making your delicious treats not just tasty but visually delightful.
FAQs
What if my cupcakes turn out too dense?
If your cupcakes are dense, it may be due to over-mixing the batter or using too much flour. Ensure to mix just until combined and measure flour correctly.
Can I replace the heavy cream with whipped topping?
While you can use whipped topping, heavy cream yields a richer, creamier frosting. If you choose whipped topping, the frosting will be lighter and less stable.
How do I adjust this recipe for mini cupcakes?
For mini cupcakes, reduce the baking time to about 10-12 minutes. Check for doneness with a toothpick to avoid overbaking.
What can I add to enhance the chocolate flavor further?
Adding a teaspoon of espresso powder to the batter can intensify the chocolate flavor, creating a deeper taste experience.
What should I do if the frosting is too runny?
If your frosting is too runny, try adding more powdered sugar, a little at a time, until you achieve the desired consistency.
Can I make these cupcakes without eggs?
Yes, you can substitute eggs with flax eggs or applesauce for a vegan option, though this may slightly alter the texture.
Conclusion
Oreo cupcakes are an exciting endeavor for anyone looking to create a fun and delicious dessert. The fusion of classic Oreo cookies with fluffy cupcakes offers a delightful experience for chocolate lovers and snack enthusiasts alike. By following this recipe, you’re set to delight your family and friends with a treat that is both visually captivating and absolutely scrumptious.
So roll up your sleeves and get baking. Whether enjoyed as an everyday snack or served at a special occasion, these Oreo cupcakes are guaranteed to leave everyone with smiles and satisfied taste buds. Happy baking!
Recipe Card

Refreshing Lemon Poppy Seed Chicken Salad Recipe
Ingredients
Method
- Prepare the chicken
- Make the dressing
- Combine salad ingredients
- Taste and adjust seasoning
- Serve over mixed greens
Notes
Additional serving suggestions: pair with a crisp salad, garlic bread, or roasted seasonal vegetables for balance.
For make-ahead, prep components separately and assemble just before heating to preserve texture.
Taste and adjust with acid (lemon/vinegar) and salt right at the end to wake up flavors.