Introduction
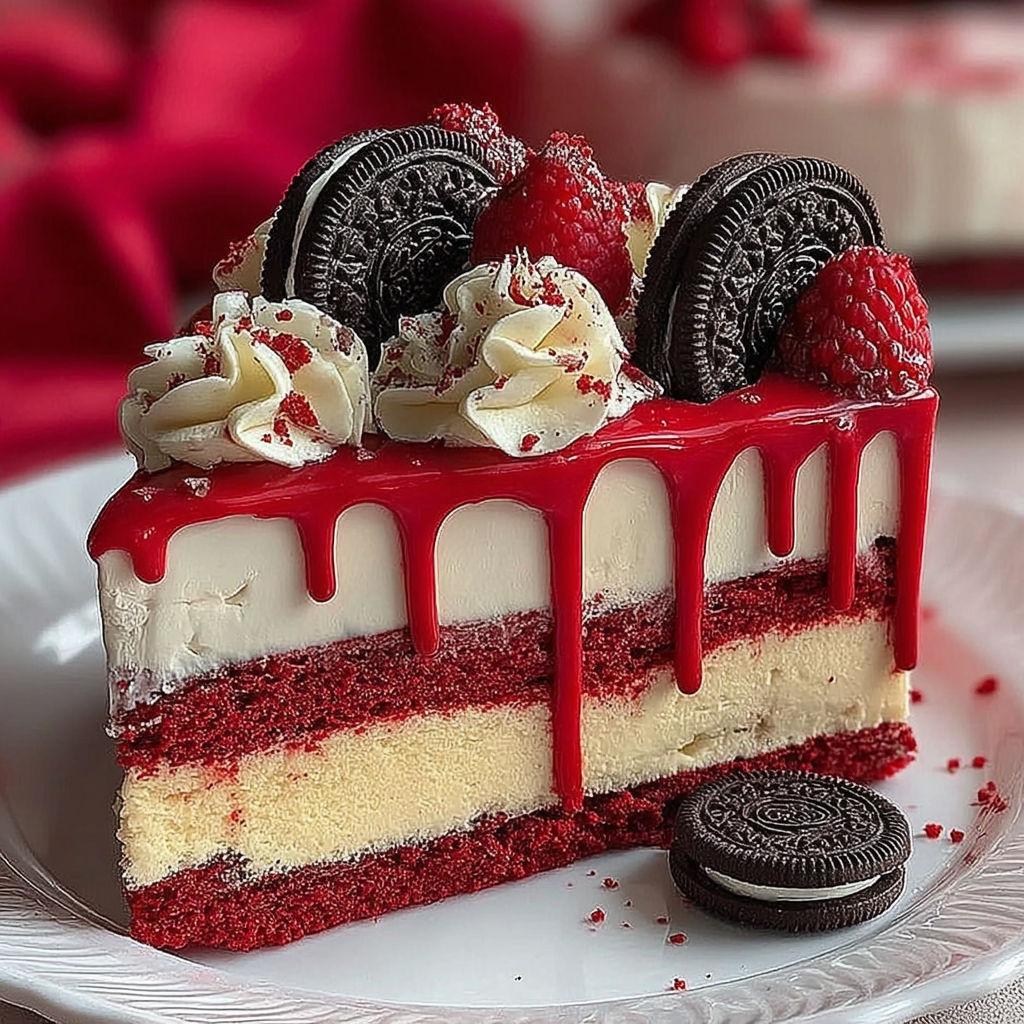
There are desserts that simply stand out, and then there's the Oreo Red Velvet Cheesecake Drip Cake. This magnificent creation is not just a feast for the eyes, but also an indulgent delight for the taste buds. Combining the rich flavors of red velvet with the creamy texture of cheesecake and the crunch of Oreos makes this cake a memorable centerpiece for any occasion.
Whether it's a special birthday, a holiday celebration, or just a weekend treat, this cake promises to elevate your dessert game. The alluring layers create harmony, while the decadent chocolate drip offers a touch of elegance. Let’s dive into crafting this sumptuous dessert that’s sure to impress.
Ingredients
- 1 ½ cups all-purpose flour
The foundation of this cake, all-purpose flour provides structure and stability. It helps create a tender crumb while ensuring the cake holds its shape when layered and frosted. - 1 cup granulated sugar
Sugar contributes sweetness and enhances flavor. In addition to sweetness, it aids in creating a light and moist crumb by incorporating air during the mixing process. - ½ cup unsweetened cocoa powder
Cocoa powder adds depth and richness to the red velvet flavor while imparting a subtle chocolate undertone. It balances the sweetness and adds a lovely dark hue. - 1 teaspoon baking powder
Baking powder is a leavening agent that helps the cake rise, giving it a light and airy texture. It’s essential for achieving the perfect sponge-like quality in this cake. - ½ teaspoon baking soda
Baking soda assists in the leavening process as well, and in conjunction with acidic ingredients, helps create a nice lift and tenderness in the cake. - ½ teaspoon salt
Salt enhances the other flavors in the cake. It balances the sweetness from the sugar while also rounding out the overall taste. - ½ cup vegetable oil
Oil adds moisture to the cake, promoting a tender and luscious texture. It fosters a richer taste compared to butter, ideal for this decadent dessert. - 2 large eggs
Eggs serve multiple roles, from binding the ingredients together to providing moisture and richness. They also contribute to the cake's structure and overall stability. - 1 teaspoon vanilla extract
Vanilla extract infuses the cake with aromatic flavors, enhancing the sweetness and making the cake taste more profound and inviting. - 1 cup buttermilk
Buttermilk adds moisture and tang, which counterbalances the sweetness and helps maintain a tender texture. Its acidity also reacts with baking soda for a lighter cake. - 4 cups cream cheese, softened
Cream cheese is the key ingredient for the cheesecake layer, providing that rich, creamy texture. Its tangy flavor complements the sweetness of the cake beautifully. - 1 ½ cups powdered sugar
Powdered sugar creates a smooth and sweet frosting for the cheesecake layer. Its fine texture ensures that the mixture blends seamlessly without grittiness. - 1 teaspoon almond extract
Almond extract adds a unique flavor profile that complements the vanilla. It enhances the overall flavor of the cheesecake, making it more intriguing. - 20 Oreo cookies, crushed
Crushed Oreos not only add a delightful crunch to the cheesecake layer but also amplify the chocolate flavor, making it a perfect pairing with red velvet. - 1 cup heavy cream
Heavy cream is essential for creating a smooth drip texture. It whips up beautifully to top the cake, adding an elegant finish while ensuring that decadent creaminess. - ½ cup chocolate ganache
Chocolate ganache is the luxurious drip finish that brings this cake together. It adds richness and a visually appealing element that makes this dessert irresistible. - Red sprinkles, for decoration
Red sprinkles enhance the visual appeal of the cake. They add a festive touch and make the finished dessert look even more celebratory.
Directions & Preparation
Step 1: Preheat your oven to 350°F (175°C).
Preheating the oven is crucial for achieving the right baking temperature right from the start. This ensures that the cake rises evenly and bakes perfectly. An oven thermometer can help ensure accurate temperatures, as even slight variations can affect the final cake.
Step 2: Grease and flour two 9-inch round cake pans.
Properly greasing and flouring the pans prevents the cake from sticking and allows for easy removal once baked. This step guarantees your beautifully baked layers maintain their integrity and ensures a professional appearance when you serve.
Step 3: In a large mixing bowl, whisk together the flour, sugar, cocoa powder, baking powder, baking soda, and salt.
Combining the dry ingredients first prevents clumping and allows for even distribution of leaveners and cocoa powder. This method ensures a uniform rise and consistent flavor throughout the cake, eliminating the risk of bitter bites from undissolved cocoa.
Step 4: In another bowl, mix the oil, eggs, vanilla extract, and buttermilk.
Mixing the wet ingredients separately allows for proper emulsification, which is critical for achieving a moist cake. The fat from the oil and the richness of the eggs combine to create a tender crumb, while the buttermilk's acidity enhances flavor and texture.
Step 5: Gradually add the wet mixture to the dry ingredients, mixing until just combined.
This crucial step prevents over-mixing, which can lead to a dense cake. Mixing until just combined ensures that the ingredients come together without developing gluten, yielding a light and fluffy texture.
Step 6: Divide the batter evenly between the prepared pans.
Evenly distributing the batter between the pans guarantees that the cakes will be of similar height. This is important for stacking and decorating later on, as uneven layers can cause instability when assembling.
Step 7: Bake in the preheated oven for 25-30 minutes or until a toothpick inserted comes out clean.
Baking to the correct time is essential for the perfect cake. Checking with a toothpick helps gauge doneness; if the toothpick comes out clean, the cakes are ready. This prevents over-baking, which could dry out the cake, compromising its decadent nature.
Step 8: Allow the cakes to cool in the pans for 10 minutes, then turn out onto wire racks to cool completely.
Cooling allows the cakes to firm up slightly, making them easier to handle. Transferring them onto wire racks ensures they cool evenly, preventing a soggy bottom from steam trapped in the pans.
Step 9: Prepare the cheesecake filling by beating the softened cream cheese and powdered sugar until smooth.
Achieving a smooth consistency is key to avoiding lumps in your cheesecake layer. This step ensures a velvety texture that will meld beautifully with the cake and provides a luxurious mouthfeel.
Step 10: Mix in the almond extract and crushed Oreos until well blended.
Incorporating the Oreos at this stage ensures their flavor permeates the cheesecake filling, giving each bite a delightful crunch. The almond extract adds a hint of depth, enhancing the overall flavor profile of the cheesecake.
Step 11: Once the cakes are completely cool, place one layer on a serving plate, spreading half the cheesecake filling on top.
Layering the cheesecake filling between the cake adds richness while keeping the overall structure stable. Ensuring the cakes are completely cool prevents the filling from melting and creating a mess.
Step 12: Top with the second cake layer and spread the remaining cheesecake filling on top.
Stacking the second layer must be done carefully to maintain the cake’s structural integrity. The cheesecake filling stabilizes the layers and adds a striking contrast against the vibrant red velvet.
Step 13: Whip the heavy cream to stiff peaks, then frost around the sides and top of the cake.
Whipping the cream until it reaches stiff peaks provides a lighter, more airy topping. This step adds an elegant finish to the cake, enhancing the richness of the layers while maintaining a light appearance.
Step 14: Drizzle the chocolate ganache over the top of the cake for a perfect drip effect.
Achieving the ideal drip requires careful temperature control of the ganache. It should be warm enough to flow but not so hot that it melts the frosting. This element adds visual appeal and a burst of chocolate flavor with each slice.
Step 15: Decorate with red sprinkles to finish the cake.
Finalizing the decoration brings everything together. Red sprinkles add a celebratory look, making the cake visually enticing and inviting for any occasion. This step can also allow for personal flair in your presentation.

The Magic of Red Velvet
Red velvet cake is beloved not just for its striking color but also for its unique taste and texture. The combination of cocoa powder and buttermilk creates a rich yet tangy flavor that pairs beautifully with creamy fillings. This cake's aesthetics coupled with its delicious profile makes it an iconic choice for celebrations, adding a festive spirit to any event.
The Creamy Cheesecake Layer
The cheesecake layer in this cake serves as the star attraction, melding perfectly with the dense red velvet. By using cream cheese, you create a rich, velvety filling that is balanced by the crunch of Oreos. This layering not only contributes to the overall visual appeal but also offers a textural contrast that enhances every bite's experience.
Tips for Perfect Drips
Creating the perfect chocolate drip can be daunting, but a few tips can help. Ensure your ganache is the right consistency; it should be smooth and warm to flow beautifully down the sides of the cake. Additionally, using a squeeze bottle or spoon can help control the flow of chocolate, making it easier to achieve that aesthetically pleasing drizzled effect!
FAQs
What should I do if my cheesecake layer is too runny?
If your cheesecake layer is too runny, it may be due to not beating the cream cheese enough or overmixing the wet ingredients. Chill the filling for a bit to help it firm up before applying it to the cake.
Can I adjust the sweetness of the cheesecake layer?
Yes, you can adjust the sweetness by decreasing the amount of powdered sugar slightly. Just remember that reducing sugar too much can impact the texture and stability of the filling.
Why does my cake dome in the center?
If your cake domes, it may be due to the oven temperature being too high or overmixing the batter. Ensure that the oven is calibrated correctly and avoid mixing beyond 'just combined' to achieve flat tops.
What can I do to enhance the flavor of the cream cheese icing?
To enhance the cream cheese icing flavor, consider adding a pinch of salt or additional extracts such as vanilla or almond. These additions can deepen the complexity and balance the sweetness.
How can I prevent my layers from sticking to the pans?
To prevent sticking, ensure you're using enough grease and flour or consider using parchment paper to line the bottoms of the pans. This allows for easy release while retaining the cake’s shape.
Is there a way to make the Oreo cheesecake filling lighter?
To lighten the Oreo cheesecake filling, you can fold in whipped cream after mixing the cream cheese and sugar. This will introduce airiness without compromising flavor.
Conclusion
Crafting a Decadent Oreo Red Velvet Cheesecake Drip Cake is a labor of love, yet each step brings you closer to an unforgettable dessert. From the vibrant layers of red velvet to the luscious cream cheese filling, every component works together harmoniously.
Serve this stunning cake at your next gathering, and watch as it becomes the highlight of the event. With a perfect combination of flavor, texture, and visual appeal, this recipe is destined to become a cherished tradition in your home.


