Introduction
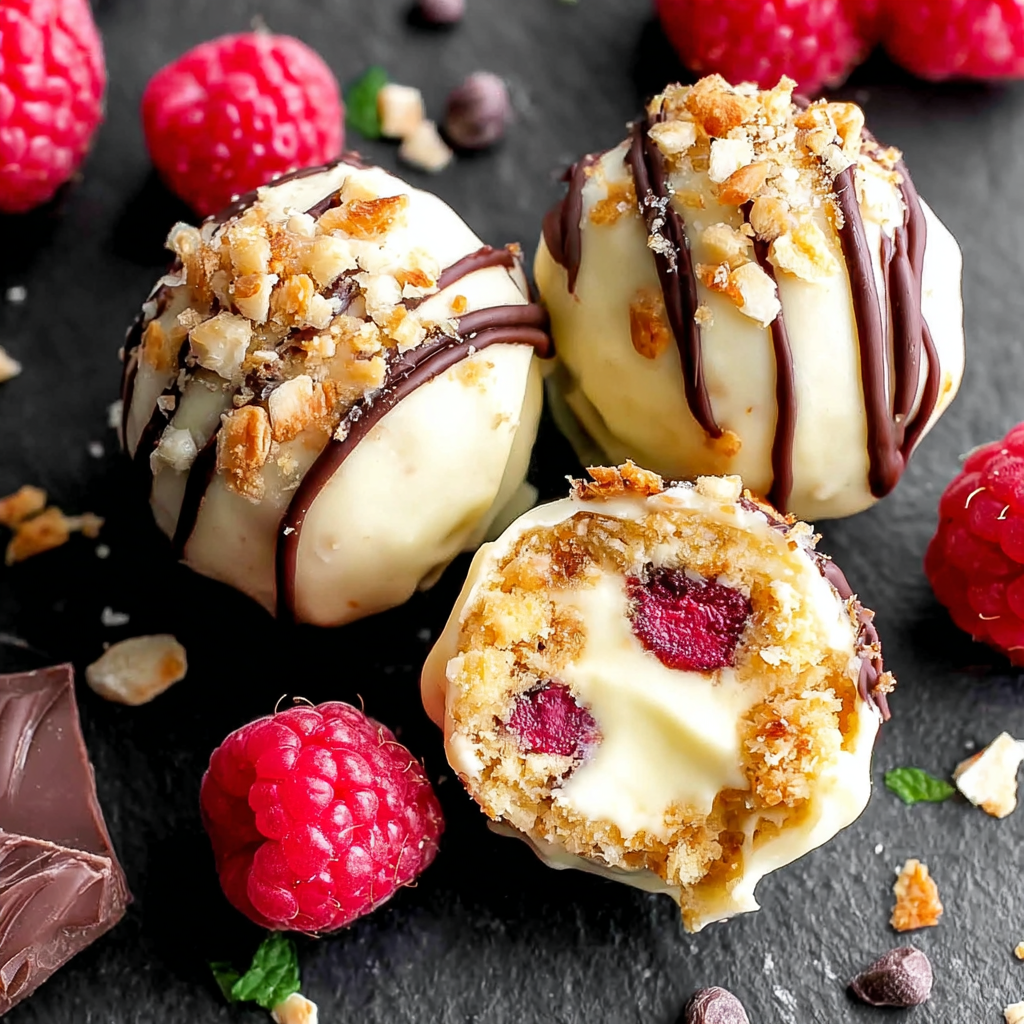
For a delightful treat that strikes a perfect balance between sweet and tangy, look no further than white chocolate raspberry cheesecake balls. These bite-sized morsels encapsulate the creamy richness of cheesecake combined with the vibrant flavor of fresh raspberries, all wrapped in a luscious coating of white chocolate.
They are a fantastic option for gatherings, dessert tables, or simply as a sweet reward for yourself after a long day. The process of making these cheesecake balls is surprisingly simple and allows for creativity, letting you customize them to your liking. With just a few straightforward steps, you can create an impressive dessert that is sure to wow your family and friends.
Ingredients
- 8 oz cream cheese, softened
Cream cheese provides the rich, creamy texture that is essential for cheesecake. Its smoothness allows the cheesecake to be rolled into balls while maintaining a dense and satisfying bite. - 1 cup powdered sugar
Powdered sugar is used to sweeten the cheesecake mixture without adding graininess, ensuring that every bite is perfectly sweet. It also helps achieve the desired creamy consistency. - 1 cup fresh raspberries, mashed
Fresh raspberries bring a vibrant tartness to balance the sweetness of the white chocolate. They also add moisture to the cheesecake mixture, enhancing the flavor and freshness. - 1 tsp vanilla extract
Vanilla extract enriches the overall flavor profile, providing warmth and a hint of depth that complements both the cream cheese and raspberry. - 2 cups white chocolate chips
White chocolate chips serve as the coating for the cheesecake balls. They provide a sweet, creamy outer layer that pairs beautifully with the tangy filling. - 1/2 cup graham cracker crumbs
Graham cracker crumbs add a pleasant crunch and traditional cheesecake flavor to the balls. They are essential for rolling before chilling and provide texture.
Directions & Preparation
Step 1: Prepare the Cheesecake Base
Begin by gathering your softened cream cheese in a mixing bowl. Ensure it's room temperature to avoid lumps in your batter. Add in the powdered sugar, mashed raspberries, and vanilla extract. Using a hand mixer or a stand mixer, blend on medium speed until the mixture is smooth and creamy. This step is crucial as it creates the primary filling, ensuring a seamless blend of flavors without any texture issues.
Step 2: Chill the Mixture
After achieving a well-combined mixture, cover it with plastic wrap and refrigerate for at least 30 minutes. Chilling firms up the cheesecake base, making it easier to scoop and roll into balls. The cool temperature also allows the flavors to meld, enhancing the raspberry and cream cheese balance that characterizes this treat.
Step 3: Form the Cheesecake Balls
Once chilled, use a tablespoon or a small cookie scoop to portion out the cheesecake mixture. Roll each portion between your palms to form smooth balls. This step should be done quickly to prevent the mixture from warming up again, making rolling more difficult. Properly shaped balls ensure more even coating and an appealing appearance.
Step 4: Prepare for Coating
Place graham cracker crumbs in a shallow dish while you prepare the white chocolate coating. This coating will further enhance the dessert’s flavor while providing a contrasting crunch to the creamy filling. Set aside enough crumbs to ensure each ball will be coated thoroughly.
Step 5: Melt the White Chocolate
In a microwave-safe bowl, melt the white chocolate chips in 30-second increments, stirring in between, until smooth. This careful approach prevents overheating, which can cause the chocolate to seize. Properly melted chocolate is essential for a smooth and glossy coating over the cheesecake balls.
Step 6: Coat the Cheesecake Balls
Dip each cheesecake ball into the melted white chocolate, ensuring an even coating. Allow any excess chocolate to drip off before rolling the ball in graham cracker crumbs. This step is key as it creates a sweet, harmonious shell that complements the filling and prevents it from becoming overly sweet.
Step 7: Chill Again before Serving
Place the coated cheesecake balls back on a parchment-lined baking sheet and refrigerate for at least another 30 minutes to set. This step solidifies the white chocolate coating, which enhances texture and allows the flavors to further develop. Serving them chilled ensures the best taste experience.
Step 8: Serve and Enjoy
Once set, transfer your delightful cheesecake balls to a serving platter and enjoy! They are perfect for celebrations or a sweet treat after dinner. This final step is where you can appreciate the fruits of your labor and share these delicious bites with family and friends.

Flavor Pairing with Raspberry
The addition of raspberries not only brightens up the cheesecake balls but also complements the sweetness of the white chocolate. Their tangy profile creates a delightful contrast that keeps the taste buds engaged. Consider using other berries or even finely chopped fruits to experiment with diverse flavor profiles. Each fruit brings a unique touch that can elevate this simple dessert.
White Chocolate Alternatives
While white chocolate is the traditional choice for coating these balls, consider experimenting with other varieties. Milk chocolate or even dark chocolate can complement the fruity tartness of the raspberries in a different manner, providing a contrasting flavor. Just remember to adjust the sweetness accordingly, as each chocolate type has its own sugar content.
Using Different Bases
For those looking to change up the texture, you can modify the base of these cheesecake balls. Instead of graham cracker crumbs, try using crushed cookies or nuts for rolling. Each brings its own flavor and texture that can add a special touch to the overall dessert experience, making it perfect for tweaking according to personal taste.
FAQs
What if my mixture seems too loose?
If your cheesecake mixture feels too loose to form into balls, chill it longer to allow it to firm up. You can also add a bit more powdered sugar or graham cracker crumbs to help thicken the texture.
Can I make these cheesecake balls bite-sized?
Certainly! Adjust the size of each ball to your preference. Smaller balls would work perfectly for bite-sized treats, enhancing party platter appeal.
What if my cheesecake filling has lumps?
In case you encounter lumps in your cheesecake mixture, ensure the cream cheese is at room temperature and thoroughly blended. You can also mix more rigorously until the mixture becomes smooth.
How can I add a bit more tartness?
For extra tang, incorporate a bit of lemon juice or additional raspberries into the filling. This will brighten the flavor and enhance the overall balance of sweetness.
Is there a way to enhance the visual appeal of the coating?
You can add colorful sprinkles or edible glitter on top of the white chocolate coating for a festive look, perfect for events or celebrations.
Can I scale this recipe for a larger crowd?
Yes, this recipe can easily be doubled or tripled. Just adjust your ingredient proportions accordingly and ensure you have enough space for chilling and coating.
Conclusion
These white chocolate raspberry cheesecake balls are not only a delicious treat but also a versatile dessert option that can be customized for different occasions. With their striking appearance and delightful flavor, they will be a hit at any gathering.
Creating these delightful bites is a simple process that allows home cooks to indulge in the joy of dessert without overwhelming complexity. So gather your ingredients, enjoy the process, and relish every moment of these sweet creations!
Recipe Card
Notes
Additional serving suggestions: pair with a crisp salad, garlic bread, or roasted seasonal vegetables for balance.
For make-ahead, prep components separately and assemble just before heating to preserve texture.
Taste and adjust with acid (lemon/vinegar) and salt right at the end to wake up flavors.