Introduction
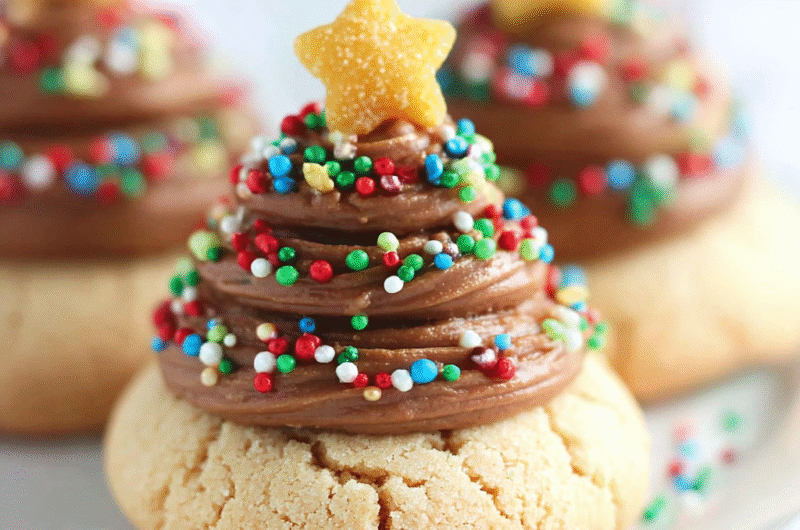
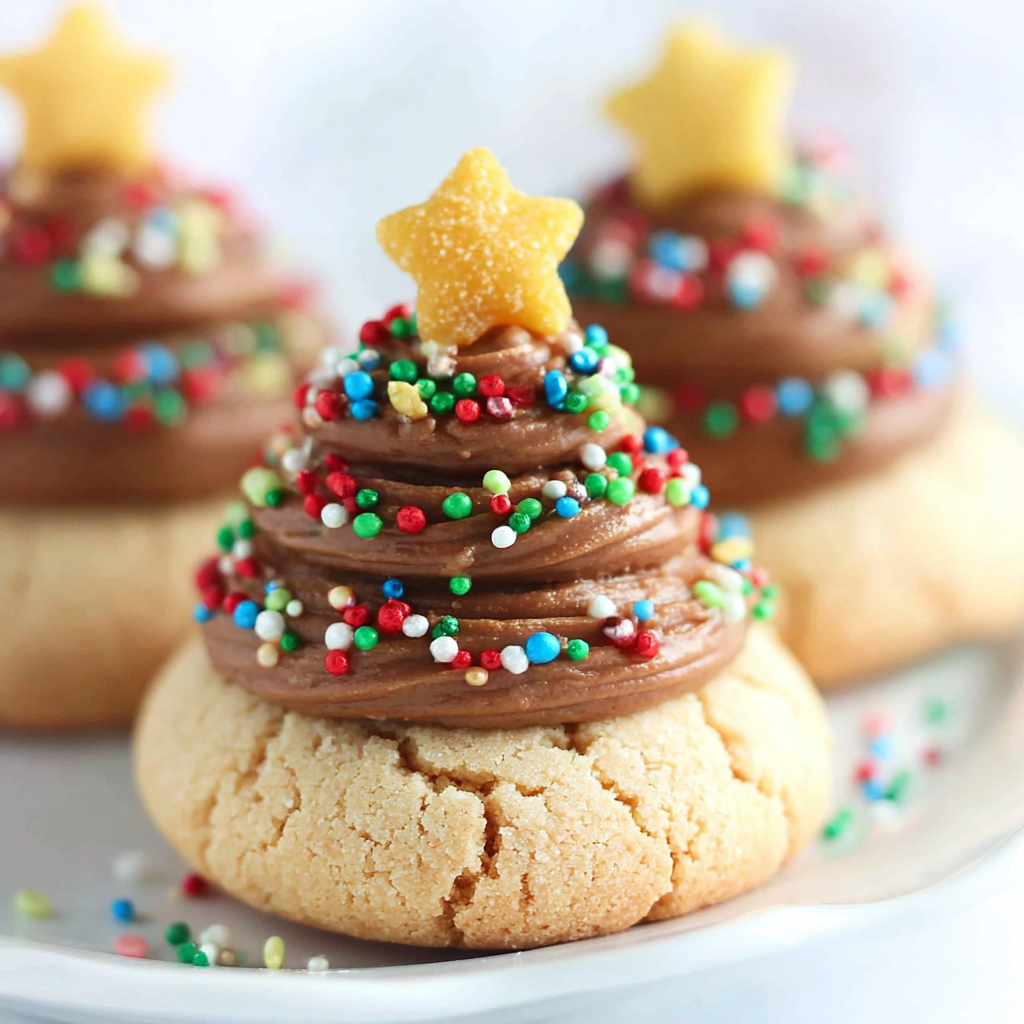
As the holiday season approaches, it brings with it the perfect opportunity to bake a batch of delightful Christmas Tree Peanut Butter Blossom Cookies. These festive treats combine rich peanut butter flavor with a charming, tree-shaped design, topped with a chocolate kiss. A hit among cookie lovers of all ages, these cookies not only taste delicious but also add a touch of holiday spirit to any gathering.
Baking these cookies is a wonderful way to create lasting memories in the kitchen, whether you’re baking solo or involving family and friends. The soft, chewy texture combined with the creamy peanut butter and the melty chocolate kiss creates an irresistible combination that captures the essence of the holiday season.
Ingredients
- 1 cup creamy peanut butter
Peanut butter is the star of the show, providing a rich and nutty base flavor that defines these cookies. Its creamy texture contributes to the softness and chewiness, making each bite satisfying. - 1 cup granulated sugar
Granulated sugar adds sweetness and helps to create a chewy texture, while also aiding in color development as the cookies bake. It balances the nutty flavor of the peanut butter. - 1 cup brown sugar
Brown sugar brings not only sweetness but also moisture and a hint of caramel flavor thanks to its molasses content. This enhances the overall depth of flavor in the cookies. - 2 large eggs
Eggs act as a binding agent, holding the ingredients together and contributing to the structure of the cookies. They also aid in leavening, giving the cookies a light texture. - 1 teaspoon vanilla extract
Vanilla extract adds depth and warmth to the flavor profile, enhancing the sweetness of the sugars and complementing the peanut butter beautifully. - 2 cups all-purpose flour
Flour provides the necessary structure and stability to the cookies. It helps them hold their shape while baking, creating that perfect cookie consistency. - 1 teaspoon baking soda
Baking soda is a leavening agent that helps the cookies rise slightly during baking, ensuring a tender texture. It also reacts with the acidity of the brown sugar. - 1/2 teaspoon salt
Salt enhances all the other flavors in the cookies, balancing sweetness and adding a subtle depth to the taste. It helps to bring out the nuttiness of the peanut butter. - 1 bag chocolate kisses
Chocolate kisses are the crowning glory of these cookies. When placed on top immediately after baking, they melt slightly, providing a creamy, chocolate finish that complements the peanut butter.
Directions & Preparation
Step 1: Preheat your oven to 350°F (175°C).
Preheating the oven is crucial for achieving the right baking temperature. It ensures that the cookies start baking immediately upon placement, which helps in creating a nice texture and even baking. A fully preheated oven will yield cookies that expand and set correctly.
Step 2: In a large mixing bowl, combine the peanut butter, granulated sugar, brown sugar, eggs, and vanilla extract. Mix until smooth and creamy.
Combining the wet ingredients first allows them to blend well, ensuring that the sugars dissolve into the peanut butter. The smooth, creamy mixture will create a harmonious flavor foundation for the cookies. Mixing until smooth is key to achieving a uniform cookie dough.
Step 3: In another bowl, whisk together the flour, baking soda, and salt.
Whisking the dry ingredients separately helps to evenly distribute the baking soda and salt throughout the flour. This step is essential for ensuring that every cookie rises evenly and is well-seasoned, preventing any pockets of baking soda or salt from affecting the taste.
Step 4: Gradually add the dry ingredients to the wet mixture, stirring until just combined.
Adding the dry ingredients gradually prevents over-mixing, which can lead to tough cookies. Stirring just until combined maintains the cookie's tender texture. The dough will be thick, so use a sturdy spatula or wooden spoon for this step.
Step 5: Scoop tablespoon-sized balls of dough and roll them into balls. Place on ungreased baking sheets, spaced a couple of inches apart.
Rolling the dough into balls helps to create a uniform shape, which is visually appealing. Proper spacing is key; cookies expand as they bake, and leaving enough room allows them to spread properly without merging.
Step 6: Bake in the preheated oven for 10-12 minutes, or until the edges are lightly golden.
Baking until the edges are lightly golden ensures that the cookies are cooked through while maintaining a soft center. It's important to keep an eye on them, as baking times can vary depending on the oven. Remove them from the oven as they begin to set.
Step 7: Remove from the oven and immediately press a chocolate kiss into the center of each cookie.
Pressing the chocolate kiss into the warm cookie allows it to melt slightly, creating a delightful topping for each cookie. Be careful not to press too hard, as you want the cookie to maintain its shape while allowing the chocolate to settle into the soft dough.
Step 8: Allow cookies to cool on the baking sheet for a few minutes before transferring them to a wire rack to cool completely.
Letting the cookies cool briefly on the baking sheet helps them set and makes transferring easier. Cooling on a wire rack lets air circulate around the cookies, preventing them from becoming soggy at the bottom and ensuring they cool evenly.

Creating Festive Shapes with Your Cookies
These Christmas Tree Peanut Butter Blossom Cookies are a fun twist on traditional peanut butter cookies and can be shaped into festive designs. Using a tree-shaped cookie cutter, roll out the dough and cut shapes before baking. Alternatively, form dough balls and mold them by hand into tree shapes. Emphasizing creativity can result in unique cookies and family bonding fun, making this baking experience even more memorable.
The Power of Chocolate in Holiday Baking
Incorporating chocolate into your cookie recipes elevates their appeal significantly. The creamy sweetness of chocolate kisses against the rich peanut butter base delivers a perfect flavor balance. Chocolate not only enhances taste but also adds visual appeal, making your cookies festive and enticing. Experimenting with different kinds of chocolate, like dark or white, can bring various flavor profiles to your holiday treats.
Baking Together: A Holiday Tradition
Baking cookies during the holiday season is a wonderful way to bring family and friends together. It fosters creativity, joy, and an atmosphere of sharing. Encourage kids or loved ones to help shape the dough or decorate the cookies. These shared moments can create lasting memories, and in the aroma of the freshly baked cookies, you’ll find warmth that embodies the spirit of togetherness during the festive season.
FAQs
What can I do if my dough is too thick?
If your dough is too thick, you can add a teaspoon of milk at a time until it reaches a soft consistency. Be cautious not to add too much liquid, as you want to maintain the dough's structure.
How can I make these cookies more festive without changing the flavor?
To enhance the festive look of your cookies, consider adding colorful sprinkles or edible glitter on top of the warm chocolate kisses right after baking, ensuring they stick beautifully.
What should I do if the cookies are too flat?
If your cookies come out too flat, it could be due to not measuring the flour correctly. Ensure you use a spoon to aerate the flour before spooning it into the measuring cup, as packed flour can affect the texture.
Can I use natural peanut butter instead of creamy peanut butter?
Yes, you can use natural peanut butter, but it may result in a different texture. Natural peanut butter typically separates and contains less sugar, so you may need to adjust sugar amounts to achieve the right consistency.
Why do my cookies crack on top?
Cracking can indicate that the cookies were overbaked slightly or that the dough was mixed too much. Always watch the baking time closely and mix until just combined for a smoother finish.
Is it possible to double the recipe?
Absolutely, you can double the recipe. Just ensure you have enough mixing space and baking sheets to accommodate the increased quantity. Divide the dough into manageable batches for easier handling.
Conclusion
Baking Christmas Tree Peanut Butter Blossom Cookies is a joyful tradition that brings warmth and sweetness to the holiday season. The combination of peanut butter and chocolate creates an indulgent treat that’s hard to resist and perfect for sharing with friends and family.
Embrace the spirit of creativity as you shape your cookies into festive designs and enjoy the delightful aroma filling your kitchen. Happy baking, and may your holidays be filled with joy, laughter, and delicious cookies!
Recipe Card
Delicious Christmas Tree Peanut Butter Blossom Cookies
Ingredients
Method
- Preheat your oven to 350°F (175°C).
- In a large mixing bowl, combine the peanut butter, granulated sugar, brown sugar, eggs, and vanilla extract. Mix until smooth and creamy.
- In another bowl, whisk together the flour, baking soda, and salt.
- Gradually add the dry ingredients to the wet mixture, stirring until just combined.
- Scoop tablespoon-sized balls of dough and roll them into balls. Place on ungreased baking sheets, spaced a couple of inches apart.
- Bake in the preheated oven for 10-12 minutes, or until the edges are lightly golden.
- Remove from the oven and immediately press a chocolate kiss into the center of each cookie.
- Allow cookies to cool on the baking sheet for a few minutes before transferring them to a wire rack to cool completely.
Notes
Additional serving suggestions: pair with a crisp salad, garlic bread, or roasted seasonal vegetables for balance.
For make-ahead, prep components separately and assemble just before heating to preserve texture.
Taste and adjust with acid (lemon/vinegar) and salt right at the end to wake up flavors.