
Introduction
There's something undeniably festive about the vibrant red of red velvet crinkle cookies. Their eye-catching color, paired with their soft, chewy texture, makes them a favorite among cookie lovers. Whether you're preparing for a holiday gathering or simply indulging yourself, these cookies are sure to impress.
Beyond their aesthetic appeal, the flavor of these cookies is rich and decadent, resembling chocolate with a hint of vanilla. The crinkly, powdered sugar-dusted tops not only add visual allure but also a delightful powdery sweetness that contrasts wonderfully with the cookies' soft interior. Let's dive into crafting these charming treats that everyone will adore.
Ingredients
- 2 cups all-purpose flour
This forms the foundation of your cookies. It supports the structure, ensuring your cookies maintain their shape while providing that classic chewy texture. Too much flour can make the cookies tough, while too little results in spreading. - 1 tablespoon cocoa powder
A crucial component for flavor, the cocoa powder adds a subtle chocolate essence crucial to traditional red velvet recipes. It also contributes to the cookies' color and enhances their richness. Use unsweetened cocoa to ensure balanced sweetness. - 1 teaspoon baking powder
This leavening agent helps the cookies rise during baking. It creates a light texture while the batter bakes, ensuring your crinkle cookies have that pleasing puff. Too little may cause dense cookies, while too much can result in a chalky taste. - 1/2 teaspoon baking soda
Baking soda works alongside baking powder to give leavening a boost, creating a tender crumb. It also interacts with acidic ingredients, contributing to the cookies' overall flavor and balance. - 1/2 teaspoon salt
Salt enhances flavor in baked goods, balancing the sweetness but also highlighting other flavors. Too little and your cookies may taste bland; too much can overpower and ruin them. - 1 cup granulated sugar
Sugar is essential for sweetness and moisture in cookies. It aids in browning during baking, creating that beautiful contrast between the red interior and white powdered surface. Excess sugar can lead to overly sweet cookies, while too little will make them flat. - 1/2 cup vegetable oil
Oil adds moisture, ensuring the cookies have a soft, tender texture. Unlike butter, which can create a different texture, oil keeps these cookies delightful and chewy, with a longer shelf-life. - 1 large egg
Eggs act as a binder in the dough, helping maintain structure while adding moisture. They also contribute richness and flavor. Be sure to use at room temperature for better incorporation. - 1 teaspoon vanilla extract
Vanilla adds warmth and complexity to the flavor profile. It enhances the sweetness and adds depth, making each cookie flavorful. Choose quality vanilla extract for the best results. - 1 tablespoon red food coloring
This ingredient gives the cookies their iconic red hue. Food coloring can vary in strength; adjust to achieve your desired shade without affecting the cookie's texture. - Powdered sugar for dusting
Dusting the cookies with powdered sugar before and after baking contributes to the trademark crinkle effect. It also adds a sweet contrast to each bite, enhancing both appearance and flavor.
Directions & Preparation
Step 1: Preheat your oven to 350°F (175°C).
Preheating the oven is a crucial first step for baking any treat. It ensures that your cookies begin to bake immediately upon entering the oven, promoting a fluffy, risen texture. Skipping this step may lead to undercooked, flat cookies.
Step 2: In a mixing bowl, combine all the dry ingredients: flour, cocoa powder, baking powder, baking soda, and salt.
Mixing the dry ingredients together not only combines them but also ensures that the baking powder and soda are evenly distributed. This is vital for achieving a uniform texture and rise across all cookies. Sifting can help prevent lumps and bolsters lightness.
Step 3: In another bowl, whisk together the granulated sugar, vegetable oil, egg, vanilla extract, and red food coloring until smooth.
Whisking these wet ingredients together creates the base for your cookie dough. It ensures even incorporation of the sugar, which is essential for proper blending. The oil becomes emulsified, adding to the final texture of your cookies.
Step 4: Gradually add the dry ingredients to the wet mixture, mixing until just combined.
This step is about blending without overworking the dough, which can lead to tough cookies. Mix until no dry flour remains visible; a few lumps are perfectly fine. This ensures a tender, chewy cookie without being cakey.
Step 5: Cover the dough and refrigerate for at least 30 minutes.
Chilling the dough is critical for the texture of your cookies. This helps the flavors meld and gives the dough a firmer structure, preventing excessive spreading during baking. Patience here elevates the end result significantly.
Step 6: Scoop out tablespoon-sized portions of dough and roll them into balls.
Rolling the dough into uniform balls ensures even baking. The size influences the final texture; too large could result in under-baked centers, while too small may cause over-crisping. Providing a shape helps with the iconic crinkle effect too.
Step 7: Roll each ball in powdered sugar until well coated.
Coating with powdered sugar not only adds sweetness but is essential for creating the visual crinkle effect during baking. The sugar absorbs moisture, helping to create a distinction between the cookie's surface and its center.
Step 8: Place the sugar-coated balls on a baking sheet lined with parchment paper.
Lining your pan with parchment paper prevents sticking and makes cleanup easier while ensuring an even bake. Spacing them properly allows for expansion; if too crowded, they won’t develop that coveted craggy top.
Step 9: Bake in the preheated oven for 10-12 minutes.
Baking time is critical for achieving the right texture. You want them just set and slightly puffy but not browned on the edges. They will continue to firm up as they cool, providing the perfect chew. Keep an eye on them toward the end for optimal results.
Step 10: Remove from the oven and allow to cool on the baking sheet for a few minutes before transferring to a wire rack.
Cooling on the sheet allows the cookies to firm up slightly, maintaining their shape during transfer. This prevents breaking or crumbling. Once moved, they can cool completely and will develop their signature chewy crust.

Unlocking the Secrets of Crinkle Texture
The iconic crinkle texture of red velvet cookies comes from the combination of powdered sugar and how the dough expands while baking. As the cookies rise in the oven, the powdered sugar forms a crust that cracks, creating a beautiful contrast against the vibrant red of the cookie. This technique relies on proper dough consistency and the right baking time, so embrace those puffy shapes!
Variations to Elevate Your Cookies
Though delicious as is, red velvet crinkle cookies provide a wonderful canvas to experiment with additional flavors or mix-ins. Consider adding white chocolate chips for an indulgent twist or incorporating nuts for added crunch. Experimenting allows you to personalize the flavor profile while keeping the beloved texture that makes these cookies so special.
Baking with Kids: Fun and Creativity in the Kitchen
Baking red velvet crinkle cookies offers a fantastic opportunity to involve children in the kitchen. Measuring, mixing, and decorating can be a creative bonding experience. Allow younger bakers to help with rolling the dough in powdered sugar, making it a fun, hands-on task. This not only teaches them essential baking skills but also ignites excitement about cooking together!
FAQs
Why didn't my cookies crinkle as expected?
Lack of crinkle often stems from not using enough powdered sugar or overmixing the dough. Ensure rolling in sugar is thorough and allow for proper chilling.
Can I use less food coloring for a lighter shade?
Yes, adjust the amount of food coloring to achieve your desired shade. Just keep in mind that too little may lead to an ambiguous red hue.
What if my cookie dough is too sticky?
If your dough is sticking excessively, you can either chill it longer or add a bit more flour until it reaches a manageable consistency.
Why did my cookies turn out dry?
Dry cookies may indicate overbaking. Keep a close eye on them; they should look set but slightly soft in the center when removed from the oven.
What if my cookies don't rise sufficiently?
Insufficient rise can result from expired baking soda or powder. Ensure these leaveners are fresh for the best results, or consider checking your oven's temperature.
Can I double the recipe for a larger batch?
Absolutely! Just ensure that you mix thoroughly, as increasing batch size can sometimes make it tricky to incorporate all ingredients evenly.
What can I do to enhance the cookie's flavor further?
In addition to vanilla, consider adding almond extract or even a hint of espresso powder to deepen the flavor profile.
Why are my cookies spreading too much while baking?
Excess spreading often results from the dough being too warm. Chill longer or ensure your baking sheet is cool before placing the dough on it.
Conclusion
Red velvet crinkle cookies are a delightful treat that can brighten any occasion. Their dazzling color, combined with an irresistibly soft center and sweet outer layer, creates a spectacular cookie that no one can resist. Making these cookies not only fills your kitchen with delightful aromas but also delivers smiles all around.
So next time you're in the mood for a fun baking project, remember these irresistible red velvet crinkle cookies. They're perfect for sharing or simply enjoying with a cup of coffee or tea. Happy baking!
Recipe Card
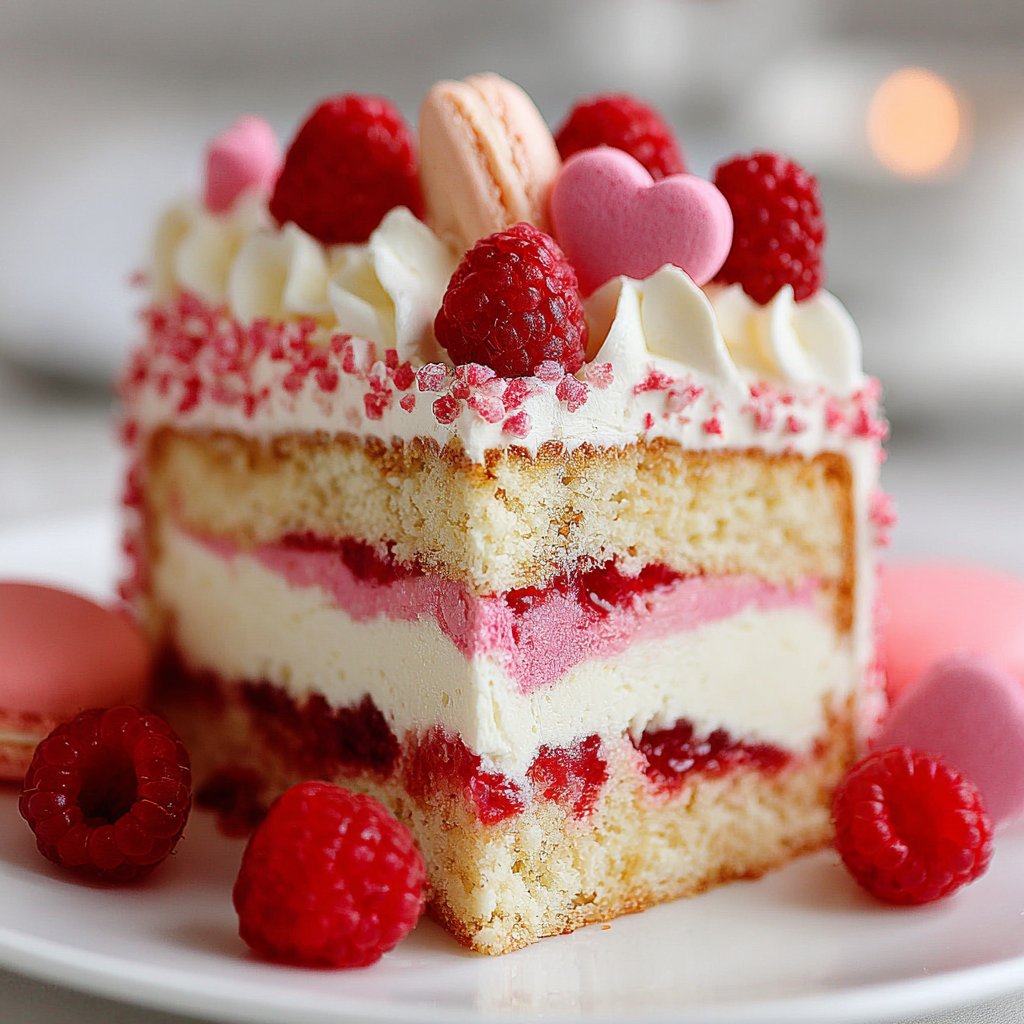
A Romantic Touch: Delightful Valentine’s Day Cake
Ingredients
Method
- Preheat your oven to 350°F (175°C).
- Grease and flour two 9-inch round cake pans.
- In a large mixing bowl, whisk together the dry ingredients: flour, sugar, cocoa powder, baking powder, baking soda, and salt.
- In another bowl, combine the buttermilk, oil, eggs, and vanilla extract.
- Gradually add the wet mixture to the dry ingredients, stirring until just combined.
- Divide the batter evenly between the prepared cake pans.
- Bake for 25-30 minutes or until a toothpick inserted in the center comes out clean.
- Let the cakes cool in the pans for 10 minutes before transferring to wire racks to cool completely.
- While the cakes cool, whip the heavy cream until soft peaks form; gradually add the powdered sugar and vanilla extract.
- Once the cakes are cool, place one layer on a serving platter and spread a generous layer of whipped cream on top.
- Place the second cake layer on top and frost the top and sides with the remaining whipped cream.
- Garnish with fresh berries on top for a vibrant finish.
- Slice and serve to celebrate Valentine’s Day with love!
Notes
Additional serving suggestions: pair with a crisp salad, garlic bread, or roasted seasonal vegetables for balance.
For make-ahead, prep components separately and assemble just before heating to preserve texture.
Taste and adjust with acid (lemon/vinegar) and salt right at the end to wake up flavors.


