Introduction
Red velvet cookies have a special charm that captivates many home bakers. Their rich color and comforting flavor evoke feelings of warmth and nostalgia, making them perfect for any occasion.
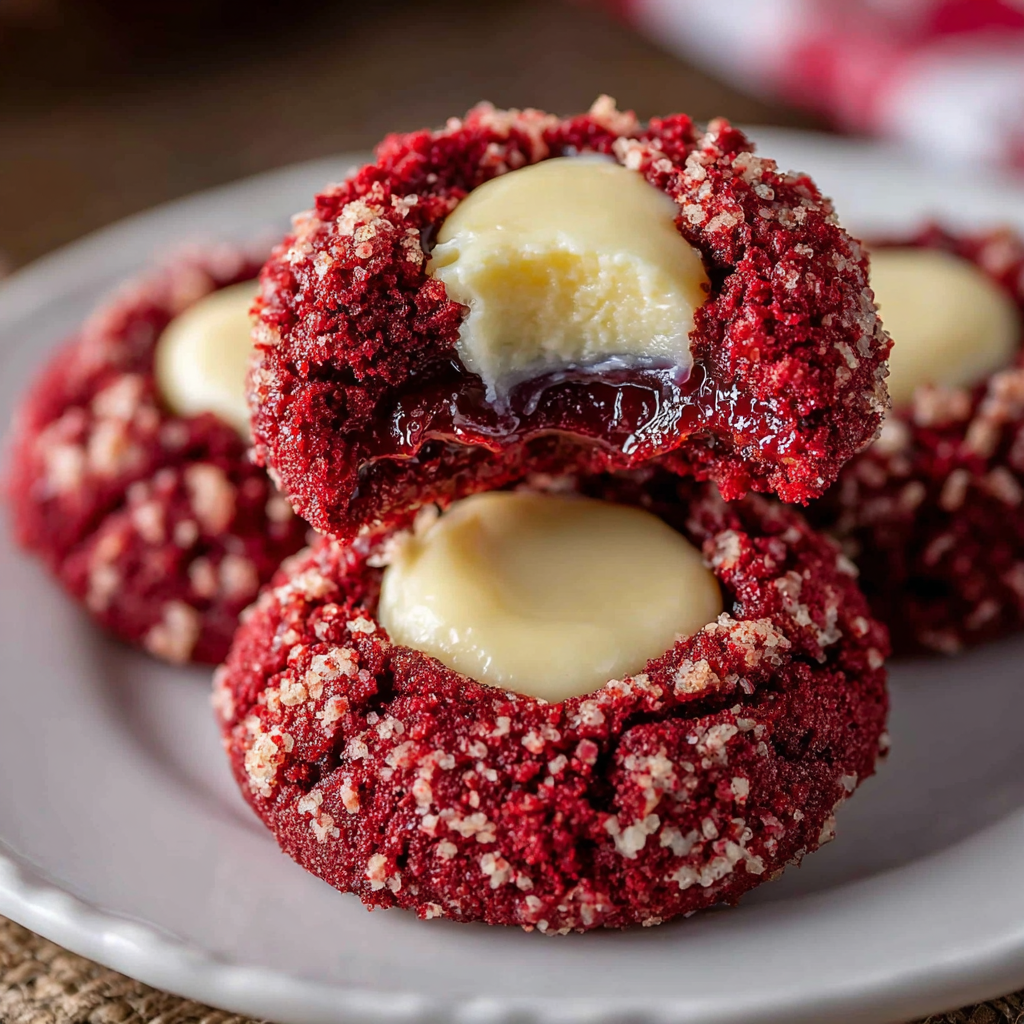
These soft and chewy thumbprint cookies are no exception. Studded with a delectable filling, they combine the classic red velvet flavor with a twist that will leave your taste buds dancing.
If you're looking to impress at your next gathering or simply want to indulge yourself, these cookies are sure to deliver on texture and taste.
Ingredients
- 2 ½ cups all-purpose flour
All-purpose flour provides the essential structure for your cookies, balancing tenderness and stability. It contributes to the chewy texture that cookie lovers adore. - 2 tablespoons cocoa powder
Cocoa powder adds a deep, chocolatey flavor that complements the red velvet essence. It's essential for achieving that classic red velvet taste. - 1 teaspoon baking soda
Acting as a leavening agent, baking soda helps the cookies rise, creating that coveted soft and chewy texture. It's crucial for baking success. - ½ teaspoon salt
Salt enhances the overall flavor of the cookies, balancing the sweetness and rounding out the flavor profile. - 1 cup unsalted butter, softened
Butter is a key ingredient for rich flavor and tender texture. Softened butter incorporates air into the dough, aiding in the cookie's overall rise. - 1 cup granulated sugar
Sugar sweetens the cookies and contributes to their chewy texture. The moisture it retains helps keep the cookies soft even after baking. - 1 large egg
Eggs provide moisture and structure, helping bind the ingredients together. They also contribute to the rich color and texture of the finished cookies. - 2 teaspoons vanilla extract
Vanilla extract enhances the flavor of the cookies, providing a warm, inviting aroma that pairs beautifully with the red velvet. - 1 tablespoon red gel food coloring
Food coloring is what gives red velvet its distinctive hue. Gel food coloring provides a vibrant color without altering the dough's consistency. - 1 cup cream cheese frosting (for filling)
Cream cheese frosting offers a tangy sweetness that contrasts beautifully with the cookies' flavor. It's the perfect finishing touch, enhancing each bite.
Directions & Preparation
Step 1: Preheat the oven to 350°F (175°C) and line baking sheets with parchment paper.
Preheating the oven ensures that your cookies start baking at the right temperature, which is crucial for achieving that ideal soft and chewy texture. Lining your baking sheets prevents sticking and promotes even baking.
Step 2: In a mixing bowl, whisk together the flour, cocoa powder, baking soda, and salt.
This step ensures that the dry ingredients are evenly combined, which is vital for your cookies to rise uniformly. Whisking also helps aerate the mixture, contributing to a lighter texture.
Step 3: In another bowl, beat the softened butter and sugar until fluffy and light in color.
Creaming the butter and sugar together introduces air into the mixture, resulting in a lighter cookie. This process is essential for soft, chewy cookies that have a delightful texture.
Step 4: Add the egg, vanilla extract, and red gel food coloring to the butter mixture, and mix until smooth.
Incorporating these wet ingredients adds moisture and richness to the dough while ensuring an even distribution of color and flavor. This is a key part of achieving the signature red velvet look and taste.
Step 5: Gradually add the dry ingredients to the wet mixture, mixing until just combined.
Mixing just until combined prevents overworking the dough, which can result in a tougher cookie. You want to retain that soft and chewy texture, so be gentle.
Step 6: Scoop tablespoon-sized balls of dough onto the prepared baking sheets, spacing them out evenly.
Proper spacing allows the cookies enough room to spread as they bake. This is critical for ensuring they maintain their shape and texture.
Step 7: Use your thumb or the back of a spoon to create an indentation in the center of each dough ball.
Creating an indentation is essential for holding the cream cheese filling once baked. Be sure not to press too hard; you want to create a nice well without flattening the cookie.
Step 8: Bake in the preheated oven for 12-15 minutes, or until the edges are set.
Baking until the edges are set while keeping the center slightly soft will help you achieve that characteristic chewy texture. Keep an eye on them to prevent overbaking.
Step 9: Let the cookies cool on the sheets for a few minutes before transferring them to a wire rack.
Cooling allows the cookies to firm up slightly, preventing them from breaking apart when moved. This step helps maintain their texture and shape.
Step 10: Once cooled, fill the indentations with cream cheese frosting.
Adding the cream cheese filling at this stage ensures it stays fresh and creamy, providing a delightful contrast to the textures and flavors of the cookies.

The Importance of Ingredient Temperature
Using room-temperature ingredients, especially butter and eggs, is crucial for achieving the right texture in cookies. When these elements are at a similar temperature, they blend more easily, resulting in a smoother and well-incorporated dough. This helps create that perfect soft and chewy texture that defines your red velvet thumbprint cookies.
Mastering the Indentation Technique
When preparing your cookies, the indentation plays a key role in how the cream cheese frosting fits into the cookie's design. The depth and shape of the well can influence how much filling you can add. A nicely formed indentation not only looks appealing but ensures that each cookie receives enough of that luscious frosting to balance its flavors.
Enhancing Flavor with Different Fillings
While cream cheese frosting is traditional, feel free to get creative with different fillings for your thumbprint cookies. For those who appreciate a fruity twist, consider using raspberry or strawberry jam. Alternatively, a rich chocolate ganache could elevate the experience, pairing well with the red velvet. Experimenting with fillings opens an avenue for creating unique versions of these delightful treats.
FAQs
Why are my cookies spreading too much during baking?
Excess spreading can occur if your butter was too warm when creaming or if the dough was not chilled before baking. Ensure your butter is softened, not melted, and consider chilling the dough for 30 minutes.
Can I reduce the amount of food coloring in the recipe?
Yes, you can reduce the amount of food coloring for a lighter shade of red. Start with half the suggested amount and adjust according to your preference, keeping in mind it may affect the visual appeal.
What can I do if my cookie dough is too thick?
If your dough is too thick to scoop, it might help to add a teaspoon of milk at a time until it reaches a more manageable consistency. Just be careful not to add too much, which can dilute the flavor.
Why did my thumbprint cookies not hold their shape?
If your cookies flatten or lose their shape after baking, it might be due to excessive mixing of the dough or not enough chilling time. Ensure you follow the mixing instructions and chill the dough if needed.
Can I use a different type of frosting for the center?
Absolutely! While cream cheese frosting complements the red velvet flavor perfectly, you can experiment with other frostings such as vanilla buttercream or flavored ganache for a twist.
What if my cookies turn out too dry?
Overbaking can cause cookies to dry out. Keep an eye on them in the last few minutes of baking, and remember that they will continue to set as they cool on the baking sheet.
Conclusion
These soft and chewy red velvet thumbprint cookies are more than just a treat; they're an experience that brings a touch of sweetness and joy to any gathering. Their vibrant color and delightful filling will surely impress your family and friends.
Baking is a journey, and with each batch of cookies, you'll discover the joy of creating something delicious. Experiment with flavors, share with loved ones, and enjoy the process as much as the delectable results.
Recipe Card
Delightful Soft & Chewy Red Velvet Thumbprint Cookies
Ingredients
Method
- Preheat the oven to 350°F (175°C) and line baking sheets with parchment paper.
- In a mixing bowl, whisk together the flour, cocoa powder, baking soda, and salt.
- In another bowl, beat the softened butter and sugar until fluffy and light in color.
- Add the egg, vanilla extract, and red gel food coloring to the butter mixture, and mix until smooth.
- Gradually add the dry ingredients to the wet mixture, mixing until just combined.
- Scoop tablespoon-sized balls of dough onto the prepared baking sheets, spacing them out evenly.
- Use your thumb or the back of a spoon to create an indentation in the center of each dough ball.
- Bake in the preheated oven for 12-15 minutes, or until the edges are set.
- Let the cookies cool on the sheets for a few minutes before transferring them to a wire rack.
- Once cooled, fill the indentations with cream cheese frosting.
Notes
Additional serving suggestions: pair with a crisp salad, garlic bread, or roasted seasonal vegetables for balance.
For make-ahead, prep components separately and assemble just before heating to preserve texture.
Taste and adjust with acid (lemon/vinegar) and salt right at the end to wake up flavors.