Introduction
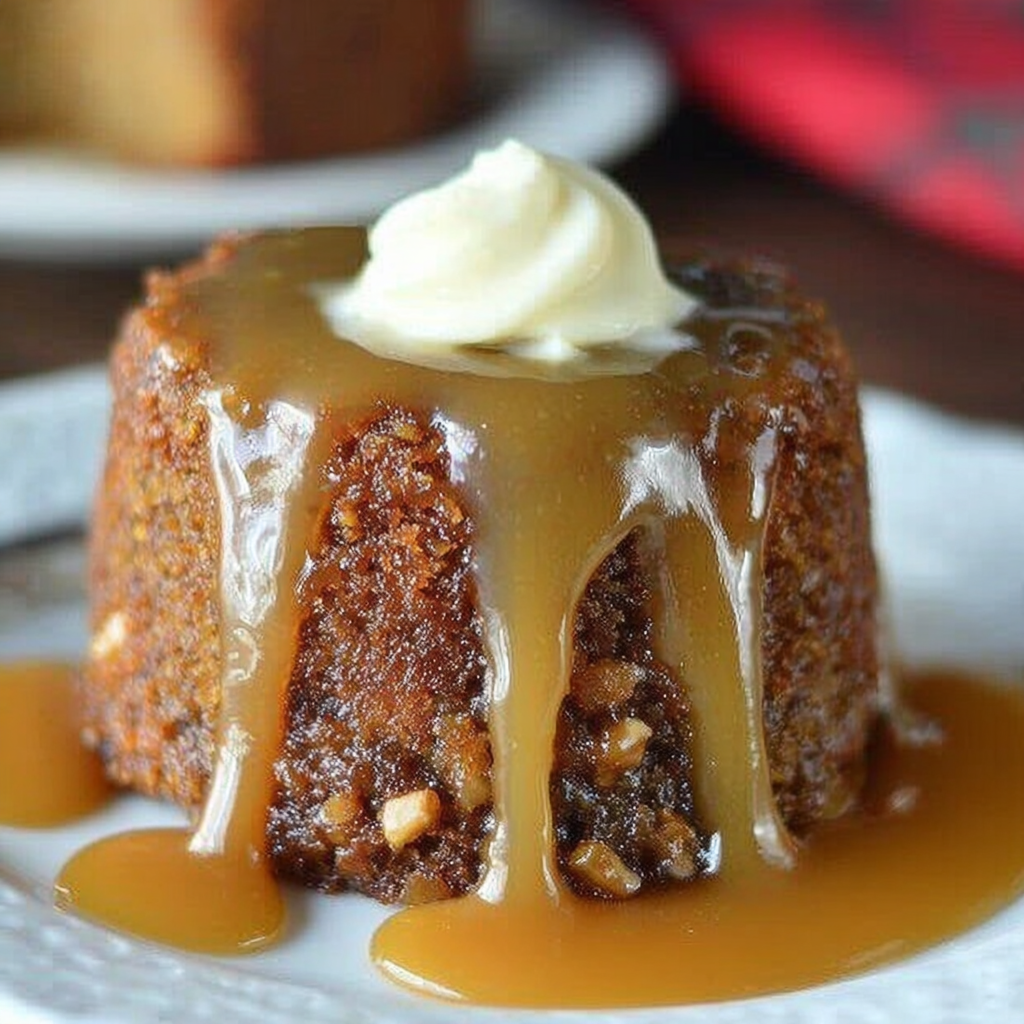
Sticky toffee pudding cake is a quintessential British dessert that combines rich flavors and delightful texture. This indulgent treat, drenched in toffee sauce, is perfect for special occasions or simply when you need a comfort dessert. Friends and family will be enchanted as they cut into the moist cake and reveal the luscious sauce beneath.
Originating from the late 20th century, sticky toffee pudding has become a beloved staple on dessert menus across the world. Its buttery sponge, coupled with the sweet, sticky toffee sauce, creates a heartfelt experience that warms your soul. Making this cake at home can bring joy not only to the taste buds but also to your kitchen as the aroma fills the air. Let's delve into how to create this classic delight.
Ingredients
- 1 cup (200g) chopped dates
Chopped dates provide natural sweetness and moisture to the cake. They contribute to the rich, sticky texture that defines sticky toffee pudding, and their unique caramel-like flavor enhances the overall experience. - 1 cup (240ml) boiling water
Boiling water is essential for softening the dates before mixing them into the batter. This step ensures a smooth consistency and integrates the dates seamlessly into the cake. - 1 teaspoon baking soda
Baking soda acts as a leavening agent, helping the cake to rise and become fluffy. It also reacts with the acidity of the dates to enhance the cake's flavor. - 4 tablespoons unsalted butter, softened
Butter adds richness and flavor to the cake. In this recipe, it aids in creating a tender crumb while also contributing to the overall moistness. - 3/4 cup (150g) brown sugar
Brown sugar introduces a deep, molasses flavor that is characteristic of sticky toffee pudding. It also enhances the cake’s moisture and creates a delightful caramel hue. - 2 large eggs
Eggs bind the ingredients and provide structure to the cake. They also contribute to the richness and moist texture that makes this pudding so indulgent. - 1 teaspoon vanilla extract
Vanilla extract adds a warm, aromatic note that enhances the cake's flavor profile. It complements the sweetness of the toffee sauce and dates. - 1 cup (125g) all-purpose flour
All-purpose flour forms the base of the cake, contributing to its structure. The right amount of flour ensures the cake is light yet sturdy enough to hold the luscious toffee. - 1 teaspoon baking powder
Baking powder works in conjunction with baking soda to provide additional leavening, resulting in a lighter texture and a cake that remains moist throughout. - 1 cup (240ml) heavy cream
Heavy cream is key for making the sticky toffee sauce, contributing to its richness and providing a silky, smooth texture that melts in your mouth. - 1 cup (200g) brown sugar (for sauce)
Using brown sugar in the toffee sauce enhances the caramel flavor, making it rich and deliciously sticky. It also adds depth to the overall taste. - 1/2 cup (120ml) water (for sauce)
Water is necessary to help dissolve the sugar in the saucepan, creating a luscious sauce that perfectly complements the cake. - Pinch of salt
A small pinch of salt in both the cake and the sauce balances the sweetness and enhances all the flavors in this rich dessert.
Directions & Preparation
Step 1: Preheat your oven to 350°F (175°C) and prepare a cake pan.
Preheating the oven ensures that the cake bakes evenly from the start. Greasing and lining the cake pan will prevent sticking, allowing for easy removal once the cake has cooked. This initial preparation sets the stage for a successful baking experience.
Step 2: Combine the chopped dates and boiling water; let steep for 15 minutes.
This step allows the dates to soften, making them easier to incorporate into the batter. After steeping, the mixture will transform into a thick, almost puree-like consistency, which is essential for achieving the moist texture unique to this cake.
Step 3: Stir in baking soda once the date mixture cools slightly, and set it aside.
Adding baking soda to the date mixture not only aids in leavening during baking but also helps develop the flavors richly. The reaction between the baking soda and the dates creates a lovely depth of flavor.
Step 4: In a mixing bowl, cream together the softened butter and brown sugar until light and fluffy.
Creaming butter and sugar is crucial for incorporating air into the mixture, contributing to a lighter cake. The calorie-friendly combination also brings out the rich flavor that is so important in sticky toffee pudding.
Step 5: Add the eggs one at a time, beating well after each addition, and then mix in the vanilla.
Incorporating eggs slowly helps maintain the emulsion needed for an airy batter. The addition of vanilla at this stage enriches the overall flavor, creating a delightful base that enhances the date mixture.
Step 6: Gradually add the flour, baking powder, and the cooled date mixture, mixing until just combined.
Mixing the dry ingredients into the wet helps retain the air already incorporated, ensuring a fluffy cake. Be careful not to overmix; a few lumps are okay since they'll dissolve during baking.
Step 7: Pour the batter into your prepared cake pan and smooth the top.
Evening out the batter ensures a uniform rise during baking. This step is important for achieving a visually appealing cake with an even texture throughout.
Step 8: Bake for 30-35 minutes, or until a toothpick inserted in the center comes out clean.
Baking time can vary, so start checking around 30 minutes. A toothpick test is the key to knowing the cake is done; it shouldn't have wet batter clinging to it, indicating the cake is fully set.
Step 9: While the cake bakes, make the toffee sauce. Combine brown sugar, cream, water, and a pinch of salt in a saucepan over medium heat.
By combining these ingredients over medium heat, you create a toffee sauce that comes together beautifully. Constant stirring will prevent burning and help achieve a smooth, creamy consistency.
Step 10: Bring the mixture to a gentle boil, then reduce heat and simmer for about 5 minutes until thickened.
Simmering helps to develop the flavors further and thicken the sauce. Be sure to maintain a gentle boil to prevent the sugar from crystalizing, which can ruin the silky texture.
Step 11: Once the cake is done, let it cool in the pan for a few minutes, then invert it onto a serving plate.
Cooling the cake slightly in the pan makes it easier to handle without breaking. Inverting onto a serving plate is the final step to reveal the cake's beautiful shape!
Step 12: Poke holes into the top of the cake with a skewer and pour half of the toffee sauce over it while still warm.
Poking holes allows the toffee sauce to seep into the cake, saturating it with flavor and moisture. This step is vital for achieving the signature sticky consistency that makes this cake extraordinary.
Step 13: Allow the cake to absorb the sauce for at least 10 minutes before serving with the remaining sauce.
Letting the cake rest allows the flavors to meld together beautifully, making every bite a delightful experience. Serving with additional sauce ensures each slice is decadently rich and satisfying.

The Sweet History of Sticky Toffee Pudding
Sticky toffee pudding, a dessert that embodies the essence of British cuisine, has a relatively modern origin story. First served in the Lake District, it gained immense popularity in the 1970s, delighting palates with its unique combination of rich flavors and gooey textures. As restaurants began featuring it, sticky toffee pudding became a cherished favorite, evolving into various adaptations while remaining true to its original essence.
Tips for the Perfect Sauce
Creating a perfect toffee sauce can be just as essential as baking the cake itself. The key is to use a heavy-bottomed saucepan and to stir consistently while bringing the mixture to a boil. Control the heat to avoid burning, and allow the sauce to simmer just enough to thicken. This delicate balance ensures the sauce retains a pourable consistency without losing its rich flavor.
Serving Suggestions for Extra Indulgence
While sticky toffee pudding cake shines on its own, there are endless ways to enhance the experience. Consider serving it alongside a scoop of vanilla ice cream that fully melts into the warm cake, or pair it with a dollop of whipped cream for added richness. For a unique twist, a drizzle of freshly made espresso over the top can provide a delightful contrast to the sweetness, elevating your dessert to new heights.
FAQs
What can I do if the cake is too dense?
If the cake turns out dense, you may have overmixed the batter or added too much flour. For future attempts, ensure you mix until just combined and measure flour accurately.
How can I adjust the sweetness of the toffee sauce?
You can reduce the amount of brown sugar by up to 1/4 cup if you prefer a less sweet sauce. Just keep in mind that this will alter the richness slightly.
What if my toffee sauce is too thick?
If the sauce turns out too thick, you can thin it by adding additional cream or water, a tablespoon at a time, while mixing on low heat until you reach your desired consistency.
Can I substitute any ingredients in this recipe?
You can use chopped prunes or figs in place of dates for a different flavor profile. However, the overall texture and sweetness may change slightly.
What if my dates aren't softening enough?
If your dates are not softening after steeping, you may want to let them sit in boiling water for a bit longer or even blend them before adding to the batter.
How do I know when the cake is fully baked?
A toothpick inserted in the center should come out clean or with only a few moist crumbs attached, indicating that the cake is perfectly baked.
Conclusion
Making sticky toffee pudding cake at home not only fills your kitchen with a comforting aroma but also serves up a dish that is sure to delight everyone at your table. The combination of moist cake and rich toffee sauce offers a wonderful experience that can be enjoyed at any time of year.
As you master this classic British dessert, consider personalizing it with unique flavors or accompaniments. With each bite, you'll discover why this dessert has become a beloved staple and a cherished part of so many gatherings.
Recipe Card
Notes
Additional serving suggestions: pair with a crisp salad, garlic bread, or roasted seasonal vegetables for balance.
For make-ahead, prep components separately and assemble just before heating to preserve texture.
Taste and adjust with acid (lemon/vinegar) and salt right at the end to wake up flavors.