Introduction
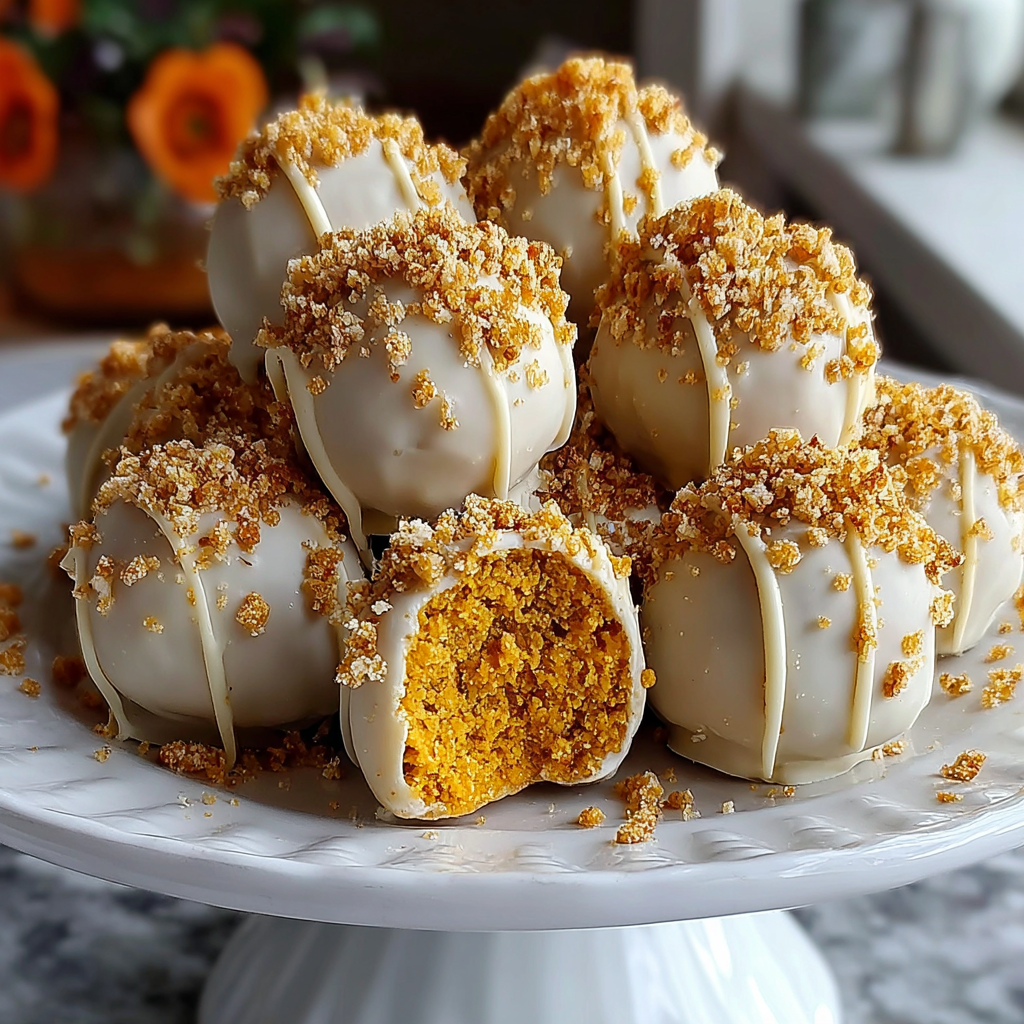
Nothing brings in the holiday spirit quite like festive treats, and these Little Debbie Christmas Tree Cake Truffles take that joy to a new level. Combining the nostalgic taste of a beloved childhood snack with the indulgence of chocolaty truffles, this recipe is a game-changer for home bakers. The creamy filling and delightful crunch create a perfect holiday confection that feels like a warm embrace.
Whether you’re looking for a unique gift or a sweet addition to your holiday spread, these truffles are sure to delight. They are fun to make and even more enjoyable to share, bringing smiles to faces young and old. Plus, the vibrant colors mimic the cheerful spirit of the season, making them an eye-catching centerpiece on any dessert table.
Ingredients
- 1 box Little Debbie Christmas Tree Cakes (12 cakes)
The star of this recipe is, of course, the Little Debbie Christmas Tree Cakes. These iconic treats provide the base flavor and texture for the truffles, lending a nostalgic sweetness that is instantly recognizable, making them perfect for a festive dessert. - 8 oz cream cheese, softened
Cream cheese adds a rich, velvety texture to the truffles, helping to bind the cake crumbles together. The tanginess of the cream cheese balances the sweetness of the cakes, creating a harmonious flavor profile that will satisfy your sweet tooth. - 1 cup white chocolate chips
White chocolate provides a creamy coating that envelops the truffle filling, contributing sweetness and a smooth mouthfeel. Melting these chips creates a luscious exterior that contrasts nicely with the chewy interior. - Sprinkles (for decoration)
Sprinkles not only add a festive touch, enhancing the visual appeal of the truffles, but also provide a slight crunch when you bite into them. They are an integral element that increases the holiday spirit in these treats. - 1 tbsp vegetable oil
Vegetable oil is mixed with the melted chocolate to achieve a smoother consistency, making it easier to coat the truffles. This ingredient helps the chocolate adhere better when dipping, resulting in a professional finish.
Directions & Preparation
Step 1: Crush the Little Debbie Christmas Tree Cakes.
Begin by unwrapping the Christmas Tree Cakes and placing them in a large mixing bowl. Use a fork or food processor to crumble the cakes into fine pieces. This step is crucial as it forms the base for your truffle mixture, ensuring that the texture remains smooth and easy to work with. The finer the crumble, the more consistent the filling will be.
Step 2: Add softened cream cheese to the crumbles.
Incorporate the softened cream cheese into the bowl containing the cake crumbles. Mix thoroughly until the mixture is well combined and smooth. This blending process is essential; it helps create a creamy texture that allows the flavors to meld together, resulting in a luscious filling that encapsulates the essence of the original cakes.
Step 3: Chill the mixture in the refrigerator.
After properly blending the cake and cream cheese, cover the bowl with plastic wrap and refrigerate for about 30 minutes. Chilling this mixture is important as it firms up the filling, making it easier to shape into balls. The cool temperature also helps meld the flavors together and deepens the overall taste experience.
Step 4: Form the truffles.
Once the mixture is chilled, take out small portions and roll them into uniform balls, roughly 1 inch in diameter. This shaping step is key for the final appearance of your truffles. Keeping them uniform ensures even coating and a consistent bite while enhancing the aesthetic appeal when serving.
Step 5: Melt the white chocolate.
In a microwave-safe bowl, combine the white chocolate chips and vegetable oil. Microwave in 30-second intervals, stirring in between, until melted and smooth. This melting process is crucial as it will create a glossy coating for the truffles. Ensuring that the chocolate is smooth will lead to a prettier finish and prevent clumping during the dipping process.
Step 6: Dip each ball in the melted chocolate.
Using a fork or a toothpick, dip each truffle into the melted white chocolate, allowing any excess to drip off. This is a pivotal moment; a thorough coating ensures each truffle is encased in sweetness. The extra chocolate creates a delicious outer shell that contrasts beautifully with the creamy filling.
Step 7: Decorate with sprinkles.
Before the chocolate coating sets, sprinkle your choice of colored sprinkles over the truffles. This adds a festive touch that enhances the visual appeal of your treats. It’s also a fun way to customize the look according to your holiday theme—more sprinkles mean even more joy!
Step 8: Let the truffles cool completely.
Place the decorated truffles on a baking sheet lined with parchment paper and allow them to cool at room temperature until the chocolate hardens. This is essential for ensuring that the truffles maintain their shape and have a good snap when bitten into. After cooling, you can enjoy them immediately or store them for later.

Perfecting the Truffle Texture
The texture of your truffles is crucial for an enjoyable bite. Achieving the right consistency begins with finely crumbled cake and soft cream cheese blended smoothly. Be diligent in your mixing; the smoother the mixture, the creamier and more decadent your truffles will be. A well-formed truffle should yield a slight firmness yet melt in your mouth, ensuring each bite is a rich, satisfying experience.
Embracing Your Creativity with Decorations
Don’t hesitate to put your creative twist on these truffles! While classic sprinkles are festive, consider using crushed peppermint candies, edible glitter, or colored chocolate drizzles for embellishment. Experimenting with decorative elements can take your truffles from simple to stunning, and it’s a chance to express your holiday spirit or personal taste, making these treats uniquely yours.
Truffles as a Thoughtful Gift Option
These truffles make thoughtful gifts, perfect for holiday parties or as a special treat for loved ones. Package them in festive boxes or jars, adorned with ribbons for a personal touch. Not only do they showcase your culinary skills, but they also carry the warmth of holiday sentiment. Sharing food that you’ve made with care is always a cherished gesture, especially during the holiday season.
FAQs
What if my truffle mixture is too dry?
If the mixture seems too dry to form balls, try mixing in a little more softened cream cheese. This will add moisture and help bind the ingredients together, making it easier to shape the truffles.
How do I make my chocolate coating smoother?
For a smoother chocolate coating, ensure that you add the vegetable oil to the melted chocolate. This will help thin it out slightly, allowing for easier coating and a glossy finish.
What if the chocolate coating is too thick?
If your chocolate coating appears too thick, you can add a small amount of vegetable oil and reheat the mixture gently. Stir well to achieve a smoother consistency for dipping.
Can I use darker chocolate instead of white chocolate?
Absolutely! You can substitute white chocolate with melting dark chocolate for a richer flavor. Just be aware that it will alter the overall sweetness and visual appearance of your truffles.
Why did my truffles lose their shape after coating?
If your truffles lose their shape, it may be due to being too warm when coated or the filling being too soft. Ensure that you chill the truffles thoroughly before dipping them in chocolate, and if needed, return them to the fridge to firm up.
Can I adjust the sweetness in the truffles?
Yes, you can adjust the sweetness by using less cream cheese or substituting some of the white chocolate with unsweetened cocoa powder in the filling mixture for a more balanced flavor.
Conclusion
These Little Debbie Christmas Tree Cake Truffles are an ideal treat for the holiday season, merging a beloved snack with the elegance of homemade confections. With their vibrant colors, delicious taste, and easy preparation process, they embody festive cheer in every bite.
Not only are they a delight to your taste buds, but they also make wonderful gifts or a special addition to holiday parties. Embrace this recipe and share the joy of homemade delights with family and friends during this wonderful season.
Recipe Card
Notes
Additional serving suggestions: pair with a crisp salad, garlic bread, or roasted seasonal vegetables for balance.
For make-ahead, prep components separately and assemble just before heating to preserve texture.
Taste and adjust with acid (lemon/vinegar) and salt right at the end to wake up flavors.